Showing posts with label Tips and Tricks. Show all posts

Monday, February 6, 2012

Backup your website easily

If you want to back up a directory on a computer and only copy changed files to the backup computer instead of everything with each backup, you can use the rsync tool to do this. You will need an account on the remote computer that you are backing up from. Here is the command:

rsync -vare ssh jono@192.168.0.2:/home/jono/importantfiles/* /home/jono/backup/


Here we are backing up all of the files in /home/jono/importantfiles/ on
 192.168.0.2 to /home/jono/backup on the current machine.

Monday, January 16, 2012

MySQL Database Security Tips

The MySQL database has become the world's most popular open source database because of its consistent fast performance, high reliability and ease of use. This document is intended as a quick security manual to help you bring an installed MySQL database server into conformity with best security practices.

1. Secure your server

  • Install Antivirus and Antispam software
  • Configure the operating system’s firewall
  • Consider the safety of your server's physical location
  • Install the services you intend the machine to run
  • Harden the production server and services
  • Disable unnecessary services
  • Follow services vendors’ recommendations regarding patches and updates needed for the safe and secure operation of their services

2. Disable or restrict remote access

Consider whether MySQL will be accessed from the network or only from its own server.
If remote access is used, ensure that only defined hosts can access the server. This is typically done through TCP wrappers, iptables, or any other firewall software or hardware available on the market.
To restrict MySQL from opening a network socket, the following parameter should be added in the [mysqld] section of my.cnf or my.ini:

skip-networking 
The file is located in the "C:\Program Files\MySQL\MySQL Server 5.1" directory on the Windows operating system or "/etc/my.cnf" or "/etc/mysql/my.cnf" on Linux.

This line disables the initiation of networking during MySQL startup. Please note that a local connection can still be established to the MySQL server.
Another possible solution is to force MySQL to listen only to the localhost by adding the following line in the [mysqld] section of my.cnf

bind-address=127.0.0.1

You may not be willing to disable network access to your database server if users in your organization connect to the server from their machines or the web server installed on a different machine. In that case, the following restrictive grant syntax should be considered:

mysql> GRANT SELECT, INSERT ON mydb.* TO 'someuser'@'somehost';

3. Disable the use of LOCAL INFILE

The next change is to disable the use of the "LOAD DATA LOCAL INFILE" command, which will help to prevent unauthorized reading from local files. This is especially important when new SQL Injection vulnerabilities in PHP applications are found.
In addition, in certain cases, the "LOCAL INFILE" command can be used to gain access to other files on the operating system, for instance "/etc/passwd", using the following command:

mysql> LOAD DATA LOCAL INFILE '/etc/passwd' INTO TABLE table1

Or even simpler:

mysql> SELECT load_file("/etc/passwd")

To disable the usage of the "LOCAL INFILE" command, the following parameter should be added in the [mysqld] section of the MySQL configuration file.

set-variable=local-infile=0

4. Change root username and password

The default administrator username on the MySQL server is "root". Hackers often attempt to gain access to its permissions. To make this task harder, rename "root" to something else and provide it with a long, complex alphanumeric password.
To rename the administrator’s username, use the rename command in the MySQL console:

mysql> RENAME USER root TO new_user;

The MySQL "RENAME USER" command first appeared in MySQL version 5.0.2. If you use an older version of MySQL, you can use other commands to rename a user:

mysql> use mysql;
mysql> update user set user="new_user" where user="root";
mysql> flush privileges;

To change a user’s password, use the following command-line command:

mysql> SET PASSWORD FOR 'username'@'%hostname' = PASSWORD('newpass');

It is also possible to change the password using the "mysqladmin" utility:

shell> mysqladmin -u username -p password newpass

5. Remove the "test" database

MySQL comes with a "test" database intended as a test space. It can be accessed by the anonymous user, and is therefore used by numerous attacks.
To remove this database, use the drop command as follows:

mysql> drop database test;

Or use the "mysqladmin" command:

shell> mysqladmin -u username -p drop test

6. Remove Anonymous and obsolete accounts

The MySQL database comes with some anonymous users with blank passwords. As a result, anyone can connect to the database To check whether this is the case, do the following:

mysql> select * from mysql.user where user="";

In a secure system, no lines should be echoed back. Another way to do the same:

mysql> SHOW GRANTS FOR ''@'localhost';
mysql> SHOW GRANTS FOR ''@'myhost';

If the grants exist, then anybody can access the database and at least use the default database "test". Check this with:

shell> mysql -u blablabla

To remove the account, execute the following command:

mysql> DROP USER "";

The MySQL "DROP USER" command is supported starting with MySQL version 5.0. If you use an older version of MySQL, you can remove the account as follows:

mysql> use mysql;
mysql> DELETE FROM user WHERE user="";
mysql> flush privileges;

7. Lower system privileges

A very common database security recommendation is to lower the permissions given to various parties. MySQL is no different. Typically, when developers work, they use the system's maximum permission and give less consideration to permission principles than we might expect. This practice can expose the database to significant risk.
* Any new MySQL 5.x installation already installed using the correct security measures.
To protect your database, make sure that the file directory in which the MySQL database is actually stored is owned by the user "mysql" and the group "mysql".

shell>ls -l /var/lib/mysql

In addition, ensure that only the user "mysql" and "root" have access to the directory /var/lib/mysql.
The mysql binaries, which reside under the /usr/bin/ directory, should be owned by "root" or the specific system "mysql" user. Other users should not have write access to these files.

shell>ls -l /usr/bin/my*

8. Lower database privileges

Operating system permissions were fixed in the preceding section. Now let’s talk about database permissions. In most cases, there is an administrator user (the renamed "root") and one or more actual users who coexist in the database. Usually, the "root" has nothing to do with the data in the database; instead, it is used to maintain the server and its tables, to give and revoke permissions, etc.
On the other hand, some user ids are used to access the data, such as the user id assigned to the web server to execute "select\update\insert\delete" queries and to execute stored procedures. In most cases, no other users are necessary; however, only you, as a system administrator can really know your application’s needs.
Only administrator accounts need to be granted the SUPER / PROCESS /FILE privileges and access to the mysql database. Usually, it is a good idea to lower the administrator’s permissions for accessing the data.
Review the privileges of the rest of the users and ensure that these are set appropriately. This can be done using the following steps.

mysql> use mysql;

[Identify users]

mysql> select * from users;

[List grants of all users]

mysql> show grants for ‘root’@’localhost’;

The above statement has to be executed for each user ! Note that only users who really need root privileges should be granted them.
Another interesting privilege is "SHOW DATABASES". By default, the command can be used by everyone having access to the MySQL prompt. They can use it to gather information (e.g., getting database names) before attacking the database by, for instance, stealing the data. To prevent this, it is recommended that you follow the procedures described below.
  • Add " --skip-show-database" to the startup script of MySQL or add it to the MySQL configuration file
  • Grant the SHOW DATABASES privilege only to the users you want to use this command
To disable the usage of the "SHOW DATABASES" command, the following parameter should be added in the [mysqld] section of the /etc/my.cnf:
[mysqld]
skip-show-database

9. Enable Logging

If your database server does not execute many queries, it is recommended that you enable transaction logging, by adding the following line to [mysqld] section of the /etc/my.cnf file:

[mysqld]
log =/var/log/mylogfile

This is not recommended for heavy production MySQL servers because it causes high overhead on the server.
In addition, verify that only the "root" and "mysql" ids have access to these logfiles (at least write access).
Error log
Ensure only "root" and "mysql" have access to the logfile "hostname.err". The file is stored in the mysql data directory. This file contains very sensitive information such as passwords, addresses, table names, stored procedure names and code parts. It can be used for information gathering, and in some cases, can provide the attacker with the information needed to exploit the database, the machine on which the database is installed, or the data inside it.
MySQL log
Ensure only "root" and "mysql" have access to the logfile "*logfileXY". The file is stored in the mysql data directory.

10. Change the root directory

A chroot on Unix operating systems is an operation that changes the apparent disk root directory for the current running process and its children. A program that is re-rooted to another directory cannot access or name files outside that directory, and the directory is called a "chroot jail" or (less commonly) a "chroot prison".
By using the chroot environment, the write access of the MYSQL processes (and child processes) can be limited, increasing the security of the server.
Ensure that a dedicated directory exists for the chrooted environment. This should be something like: /chroot/mysql In addition, to make the use of the database administrative tools convenient, the following parameter should be changed in the [client] section of MySQL configuration file:

[client]
socket = /chroot/mysql/tmp/mysql.sock

Thanks to that line of code, there will be no need to supply the mysql, mysqladmin, mysqldump etc. commands with the --socket=/chroot/mysql/tmp/mysql.sock parameter every time these tools are run.

11. Remove History

During the installation procedures, there is a lot of sensitive information that can assist an intruder to assault a database. This information is stored in the server’s history and can be very helpful if something goes wrong during the installation. By analyzing the history files, administrators can figure out what has gone wrong and probably fix things up. However, these files are not needed after installation is complete.
We should remove the content of the MySQL history file (~/.mysql_history), where all executed SQL commands are stored (especially passwords, which are stored as plain text):

cat /dev/null > ~/.mysql_history

12. Patch your systems

Consult you operation system’s vendor for security and performance updates: use windows update on windows, apt-get or yum on (Debian) systems, Red Hat update Agent on Red hat and so on.


Sunday, January 15, 2012

Having technical problems accessing an online article in a database or e-journal? Try these tips and tricks.

Try a different browser

Internet Explore works best for MOST databases, while it won't work properly in others. The same is true with Firefox, Google Chrome and Safari. Also, make sure you have an up-to-date browser. Often databases don't support older versions of browsers. If you are using a Mac, try using Safari. Try accessing the resource with a different browser and see if you get the same error. Some popular browsers are: Mozilla Firefox, Internet Explorer, Opera, Chrome, or Safari. **Please do not uninstall your original browser after downloading an alternate browser.**

Clear your cache

Try clearing your cache and re-starting your browser this solves many problems.
Clearing Cache Instructions
Cache is a local storage area in your browser in which previously viewed web pages and images are stored. If a previously viewed web page is accessed again, the copy is loaded from the cache. To ensure that the current copy is loaded from the server and not from the cache, clear the cache in your browser and load the page again. Clearing your cache can also improve the speed and performance of your browser.

Firefox
  1. Select Tools and select Options.
  2. Click the Advanced icon and click the Network tab.
  3. Click Clear Now under the Cache section.
  4. Click OK.
  5. Exit and re-launch the browser.
Internet Explorer
  1. Select Tools from the top menu
  2. Choose Internet Options
  3. Click the General tab.
  4. Click Delete under the Browsing History section.
  5. Click Delete Files in the Delete Browsing History dialog box.
  6. Click OK.
  7. Click Close.
  8. Close and re-launch your browser.
Safari 
  1. Click the Safari menu and select Empty Cache.
  2. Click Empty on the Are you sure message box.
  3. Exit and re-launch the browser.
Firefox
  1. Click the Firefox menu and select Preferences.
  2. Click the Advanced icon and click the Network tab.
  3. Click Clear Now under the Cache section.
  4. Click the X in the top left corner to close the Advanced window.
  5. Exit and re-launch the browser.

Allow cookies

Check to be sure your browser is set to accept cookies. Many databases require the use of cookies and won't work if they are blocked.
A cookie is a file created by a web site that stores information on your computer, such as site-specific preferences when visiting that site. Some sites may not work properly when cookies are disabled.

Firefox
  1. Select Tools from the top menu.
  2. Select Options.
  3. Click the Privacy icon at the top.
  4. In the Cookies section, check the box corresponding to "Accept cookies from sites ".
  5. Click "OK" to save changes.
Internet Explorer
  1. Select Tools from the top menu
  2. Choose Internet Options
  3. Click on the Privacy tab
  4. Click the ‘Default' button
  5. Click ‘Apply' and "OK".
Safari 
  1. Click the Safari menu item, and click Properties. A new window will pop-up.
  2. Click the Security icon in the menu bar of the pop-up window.
  3. Make sure that Accept Cookies is set to either ‘Always', or 'Only from sites you navigate to'.
Firefox
  1. Click the Firefox menu, then click Preferences.
  2. In the left-hand column, click the icon labeled Privacy.
  3. Click Cookies, then click the option labeled "Allow sites to set cookies.
  4. Click OK to save changes and close the dialog box.

Deleting Cookies

Firefox
  1. Click Tools and select Options.
  2. Click the Privacy Icon.
  3. Click Show Cookies under the Cookies section.
  4. Click Remove All Cookies and click Close.
  5. Click OK.
  6. Close and re-launch your browser.
Internet Explorer
  1. Select Tools from the top menu
  2. Choose Internet Options
  3. On the General tab, click Delete under Browsing History in the Internet Properties dialog box.
  4. In the Delete Browsing History dialog box, click Delete Cookies.
  5. In the Delete Cookies dialog box, click Yes.
Safari
  1. Click the Safari menu and select Preferences.
  2. Click the Security icon and click Show Cookies.
  3. Click Remove All.
  4. Click Remove All on the Are you sure message box.
  5. Click Done.
  6. Click the X in the top left corner to close the Security window.
  7. Close and re-launch your browser.
Firefox
  1. Click the Firefox menu and select Preferences.
  2. Click the Privacy icon.
  3. Click Show Cookies under the Cookies section.
  4. Click Remove All Cookies.
  5. Click the X in the top left corner to close the Cookies window.
  6. Click the X in the top left corner to close the Privacy window.
  7. Close and re-launch your browser.

Adjust pop-up blocker settings

A few databases require the use of pop-ups to deliver some of their content. If you have pop-up blocker enabled on your web browser, you may need to disable it.

Firefox
  1. Click Tools in the Menu Bar
  2. Select Options
  3. Click the Content tab
  4. Check the box associated with Block pop-up windows.
  5. Click OK to save your changes
Internet Explorer
  1. Click the Tools menu item.
  2. Click the Pop-up Blocker option.
  3. Click Turn Off Pop-up Blocker
Safari
  1. Click Safari menu
  2. Uncheck Block Pop-Up windows
Firefox
  1. Click Firefox menu, select Preferences
  2. When the Preferences open, select the Content icon.
  3. Uncheck the Block Pop-ups windows.
  4. Reload the current page

Enable Javascript

JavaScript is a scripting language commonly used to make web pages interactive. Disabling JavaScript may cause some sites to not work properly.

Firefox
  1. Select Tools from the top menu
  2. Choose Options
  3. Click the Content icon at the top
  4. Select the checkbox next to Enable JavaScript and click OK
Internet Explorer
  1. Select Tools from the top menu
  2. Choose Internet Options
  3. Click on the Security tab
  4. Click on Custom Level
  5. Scroll down until you see section labeled Scripting
  6. Under Active Scripting select Enable and click OK
  7. Click the OK button to close the Internet Options window
Safari
  1. Click the Safari menu item, and click Properties. A new window will pop-up.
  2. Click the Security icon in the menu bar of the pop-up window.
  3. Make sure the boxes next to Enable JavaScript and are checked.
Firefox 
  1. Click on the Firefox menu, and select Preferences
  2. Click on Content icon
  3. Make sure that Enable JavaScript is selected

Enable Java

Java is a popular programming language for the Web used to create interactive or animated web content. Disabling Java may cause some sites to not work properly.

Firefox
  1. Choose Tools from the Menu bar, then Options.
  2. In the Options dialogue, select the Content icon and make sure both the Enable JavaScript and Enable Java check boxes are selected.
  3. Click the OK button.
Internet Explorer
  1. Click Tools select Internet Options
  2. Select the Advanced Tab, and scroll down to "Java (Sun)"
  3. Check the box under Java (Sun)
  4. Next, select the Security Tab, and select the "Custom Level" button
  5. Scroll down to "Scripting of Java applets"
  6. Make sure the "Enable" radio button is checked.
  7. Click OK to save your preference.
  8. Close and re-open your web browser.
Safari
  1. From the Safari menu, select Preferences
  2. When the Preferences open select the Security icon.
  3. Check the Enable plug-ins, Enable Java and Enable JavaScript checkboxes.
  4. Reload the current page
Firefox
  1. Click on the Firefox menu, and select Preferences
  2. Click on Content icon
  3. Make sure that Enable Java is select

Allow images


Firefox
Firefox should display images in web pages by default. To check your settings
  1. Click Tools in the Menu Bar
  2. Select Options
  3. Click the Content tab
  4. Check the box Load Images Automatically.
  5. Click OK to save your changes
Internet Explorer
  1. On the Tools menu, click Internet Options.
  2. Click the Advanced tab, and then verify that the Show Pictures check box is selected under Multimedia.
  3. Click OK.
Safari
  1. From the Safari menu, select Preferences
  2. When the Preferences open select the Appearance icon.
  3. Check the Display images when the page opens.
  4. Reload the current page
Firefox 3.x and Up for Mac
  1. From the Firefox menu, select Preferences
  2. In the left-hand pane, click Web Features
  3. Check the box Load Images Automatically.
  4. Click OK to save your changes

Firewall

 Remote access to databases from work or anywhere behind a firewall may not work. Sometimes the security settings on firewalls are such that authentication via proxy server is not possible. 

Monday, January 9, 2012

Install phpMyAdmin on Linux


phpMyAdmin is a web-based tool written in PHP to manage the MySQL database. Apart from viewing the tables (and other db objects), you can perform lot of DBA functions through the web based interface. You can also execute any SQL query from the UI.


Installation  and configure of phpMyAdmin on Linux distributions.

1. phpMyAdmin Pre requisites

Make sure you have PHP 5 (or above) installed.

# php -v
PHP 5.3.2 (cli) (built: May 19 2010 03:43:49)
 
Make sure you have MySQL 5 (or above) installed.

# mysql -V
mysql  Ver 14.14 Distrib 5.1.47, for pc-linux-gnu (i686) using readline 5.1
 
Make sure Apache is installed and running.

PHP5 Modules

If you don’t have PHP, I recommend that you install PHP from source. Following is the configure command I executed while installing PHP from source. This includes all the required PHP modules for phpMyAdmin.

./configure --with-apxs2=/usr/local/apache2/bin/apxs --with-mysql --with-bz2 --with-zlib 
--enable-zip --enable-mbstring --with-mcrypt


If you don’t compile PHP5 with the above options, you’ll get following error message from phpMyAdmin web interface.
  • GZip – GZip compression and decompression requires functions (gzencode) which are unavailable on this system.
  • Bzip2 – Bzip2 compression and decompression requires functions (bzopen, bzcompress) which are unavailable on this system.
  • ZIP – Zip decompression requires functions (zip_open) which are unavailable on this system.
  • ZIP – Zip compression requires functions (gzcompress) which are unavailable on this system.

2. Download and Install phpmyadmin in Apache DocumentRoot

Identify your Apache’s DocumentRoot.


# grep DocumentRoot /usr/local/apache2/conf/httpd.conf
DocumentRoot /usr/local/apache2/htdocs


Download the latest version of phpMyAdmin
 

# cd /usr/local/apache2/htdocs

# tar xvfz phpMyAdmin-3.3.7-all-languages.tar.gz

# mv phpMyAdmin-3.3.7-all-languages phpmyadmin


3. Secure the phpmyadmin Directory – Create phpmy user

Create phpmy Unix user.

# adduser phpmy

# passwd phpmy
 
 
Check which user and group is used by Apache.

# egrep 'User|Group' /usr/local/apache2/conf/httpd.conf
User daemon
Group daemon
 
Modify the phpmyadmin directory’s user ownership to phpmy user.
# cd /usr/local/apache2/htdocs

# chown -R phpmy.daemon phpmyadmin/


4. Update phpMyAdmin config.inc from Wizard

You need to setup the config.inc file properly for phpMyAdmin to work. You can either create and edit this file manually, or use the config phpMyAdmin installer setup wizard. I recommend that you use the setup wizard, as it is very straight forward. To do that, you should create the following dummy config.inc with proper permission.


# cd /usr/local/apache2/htdocs/phpmyadmin/

# mkdir config

# chmod o+rw config

# cp config.sample.inc.php config/config.inc.php

# chmod o+w config/config.inc.php


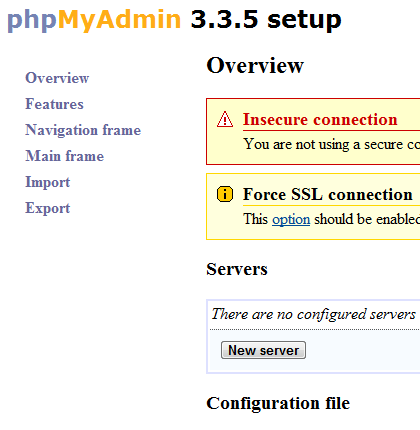
Now, invoke the phpMyAdmin setup wizard from the browser using the 
URL: http://{your-ip-address}/phpmyadmin/setup/index.php . This will 
show the following setup wizard.


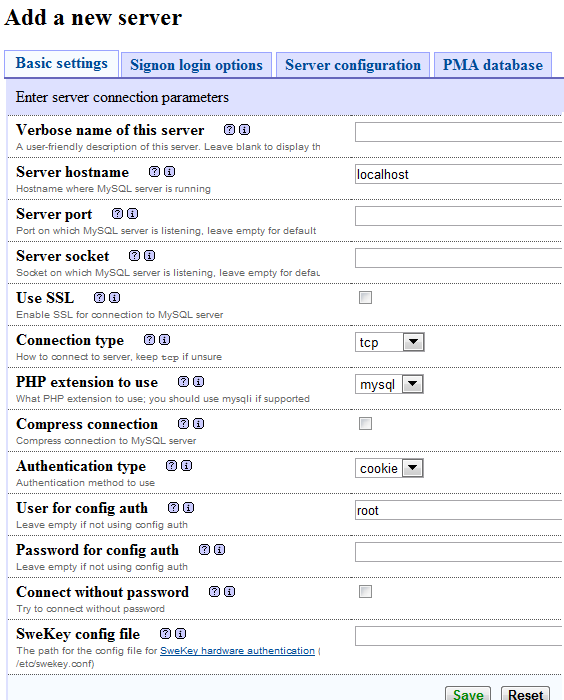
Click on “New Server”, which will display following server wizard.


Fill-out following information in the new server screen. Leave other fields to default values.
  • Verbose Name of the Server – Give some descriptive server name.
  • Password for Config Auth – Enter the MySQL root password here.
  • Authentication Type – The default selection is cookie. Just use that.
Click on Save to save the configuration. You might see following warning messages. Ignore it for now.
  • Use SSL – You should use SSL connections if your web server supports it
  • PHP extension to use – You should use mysqli for performance reasons
  • Blowfish secret – You didn’t have blowfish secret set and have enabled cookie authentication, so a key was automatically generated for you. It is used to encrypt cookies; you don’t need to remember it.

5. Launch phpmyadmin

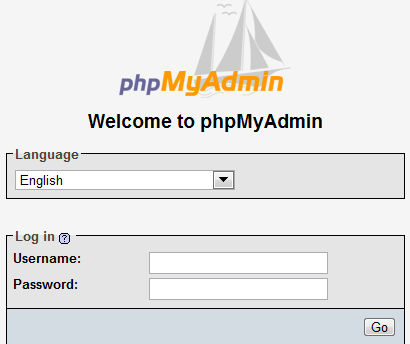
Invoke phpMyAdmin from the browser using the URL: http://{your-ip-address}/phpmyadmin/index.php
If you’ve installed phpMyAdmin on a Linux desktop distribution, you can also access phpMyAdmin using the localhost URL: http://localhost/phpmyadmin/index.php
Login with your MySQL root password. i.e use “root” for phpmyadmin username. Use MySQL root’s password for phpmyadmin password.


If you see the “Cannot load mcrypt extension. Please check your PHP configuration.” message, you didn’t compile your PHP with mcrypt. Make sure you have libmcrypt and libmcrypt-devel packages installed on your Linux before you compile PHP with –with-mcrypt option.


You will also see the message : “Directory config, which is used by the setup script, still exists in your phpMyAdmin directory. You should remove it once phpMyAdmin has been configured.”
Just like the message says, remove the config directory.


# cd /usr/local/apache2/htdocs/phpmyadmin

# rm -rf config


After moving the config directory, if you go to setup/index.php url, you’ll see following message. This is a good thing, as you’ve already configured the phpMyAdmin.
“Cannot load or save configuration. Please create web server writable folder config in phpMyAdmin top level directory as described in documentation. Otherwise you will be only able to download or display it.”
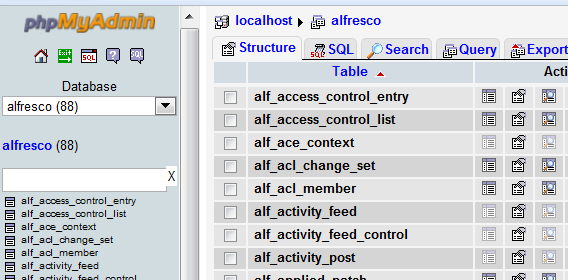
Once you’ve logged-in you should be able to manage all the MySQL databases from your browser.


Create a simple mysql database, tables and insert data for Library Books and Patron details

If you want to create a simple database and set up tables for your library management use the following two sql commands:

=> CREATE DATABASE - create the database

=> CREATE TABLE - create the table

=> INSERT - To add/insert data to table

CREATE DATABASE creates a database with the given name. To use this statement, you need the CREATE privilege for the database.

CREATE TABLE creates a table with the given name. You must have the CREATE privilege for the table.

INSERT inserts new rows into an existing table.

Create a simple mysql database, tables and insert data for Library Books and Patron details

First,we need to to have a mysql server installation

$ sudo apt-get install mysql-server

On a default settings, mysql root user do not need a password to authenticate from localhost. In this case, ou can login as root on your mysql server using:

$ mysql -u root

If a password is required, use the extra switch -p:Login as the mysql root user to create database:


$ mysql -u root -p
Enter password:    


Output:

mysql>

Add a database called books

mysql> CREATE DATABASE books;

Now database is created. Use a database with use command:

mysql> USE books;

Now create a table called authors with name, email and id:

mysql> CREATE TABLE authors (id INT, name VARCHAR(20), email VARCHAR(20));

Display your table name just created:

mysql> SHOW TABLES;

Output:
+-----------------+
| Tables_in_books |
+-----------------+
| authors         |
+-----------------+
1 row in set (0.00 sec)

Now add a data / row to table books using INSERT statement:

mysql> INSERT INTO authors (id,name,email) VALUES(1,"Vivek","xuz@abc.com");

Output:
 
Query OK, 1 row affected (0.00 sec)

Add few more rows:

mysql> INSERT INTO authors (id,name,email) VALUES(2,"Priya","p@gmail.com");
INSERT INTO authors (id,name,email) VALUES(3,"Tom","tom@yahoo.com");

Now display all rows:

mysql> SELECT * FROM authors;

Output:
+------+-------+---------------+
| id   | name  | email         |
+------+-------+---------------+
|    1 | Vivek | xuz@abc.com   |
|    2 | Priya | p@gmail.com   |
|    3 | Tom   | tom@yahoo.com |
+------+-------+---------------+
3 rows in set (0.00 sec)
Exit

mysql> exit
Bye

Saturday, December 31, 2011

isbn.net.in - A quick way to find the online prices for a book in India.

What is isbn.net.in?
A quick way to find the online prices for a book in India.
How to use
Suffix this website address with a ISBN or EAN. That's it.
Example: http://isbn.net.in/0142000280
 
Why isbn.net.in?
  1. The most reliable data possible (with Disclaimers)
  2. Get the latest prices instantly, from a comprehensive list of online book stores, along with the book cover, description and Amazon rating. 
 
But I want to search for the book, I don't have the isbn number.
Use MySmartPrice or MyDiscountBay or IndiaBookStore.
Prefer isbn.net.in personally because it (1) gets the very latest prices (2) looks at more number of online book stores.

Is there a way to make it more automatic to use?
Yes, there is a bookmarklet. Follow the instructions:
  1. Drag the following link to your browser's bookmarks toolbar:
    Book Prices in India
  2. Go to any random book page, for example, this O'Reilly book; Note that it also works with Indian ecommerce sites.
  3. Click on the bookmarklet (in your browser's bookmarks toolbar).
  4. You will now be taken to the corresponding page on isbn.net.in containing a sorted list of prices from different Indian online book stores.

Which websites do you search for prices?
It look up 17 Indian ecommerce stores for the best price for the book you want to buy:
  • A1books
  • Bookadda
  • Coinjoos
  • Coralhub
  • Crossword
  • Flipkart
  • Friendsofbooks
  • Indiaplaza
  • Infibeam
  • Kindle
  • Landmark
  • Nbcindia
  • Pustak
  • Rediff
  • Rightbooks
  • Tradus
  • Uread

Friday, December 23, 2011

Add Author Information into Word Document

This trick shows you how to add some additional information to a Microsoft Word document. The information can be the name of the author, company, title, revision number, etc... When you open the folder which contains your document, and point the mouse to the document, the information will be displayed.


Here's how

  1. Open the folder that contains the document.
  2. Right-click on the document and select "Properties".
  3. On the "Properties" dialog, select the "Summary" tab.
  4. Under the "Summary" tab, the fields are listed by two columns "Property" on the left and "Value" on the right.
Click on a field (i.e. "title") you want to edit, then edit its value. Then click "OK"

Tips to recover scratched CD's

1. Spread a cloth on a flat surface and place the CD on it.
2. Then, hold the disc with one hand, use the other to wipe the polish into the affected area with a soft cloth.
3. Wait for it to dry and buff using short, brisk strokes along the scratch, not across it.
4. A cloth sold to wipe spectacles or camera lenses will work super m8's.
5. When you can no longersee the scratch,, wash the disc with water and let it dry before playing.
 
* Fingermarks/prints cause 43% of disc problems!
* General wear & tear causes 25% of disc problems!
* Player-related issues cause 15% of disc problems!
* Remaining Others

Monday, December 19, 2011

Convert eBooks in Linux

Say you just bought an Amazon Kindle or a Barnes and Noble Nook. You want to convert your eBook collection to .EPUB or .MOBI format. For this, install Calibre. The application not only provides you with a graphical way to manage your eBook collection, but also comes with a set of useful command-line tools. One of these is ebook-convert.
This tool can help you convert between tens of standard formats like EPUB, FB2, LIT, LRF, MOBI, OEB, PDB, PDF, PML, RB, RTF, TCR, TXT, HTML and more. Even CBR and CBZ (comic book formats) are supported.
The syntax is simple:
ebook-convert input_format output_format
For example, if you want to convert a comic book archive to something readable on an e-ink screen, use
ebook-convert filename.cbz filename.epub
or
ebook-convert filename.cbz filename.pdf
Not only will ebook-convert convert the file, but it will also trim the white spaces around the page so they will better fit the small screen of an electronic eBook reader

Block Yahoo Messenger, AOL, MSN and ICQ using IPTABLES

If you’re a network administrator and you’re using Linux on your servers, you can stop the rest of the users from using IM applications by blocking their access to the most-used IM protocols:
ICQ and AOL:
# iptables -A FORWARD –dport 5190 -j DROP

# iptables -A FORWARD -d login.oscar.aol.com -j DR

OP
MSN:
# iptables -A FORWARD -p TCP –dport 1863 -j DROP

# iptables -A FORWARD -d 64.4.13.0/24 -j DROP

Yahoo Messenger:
# iptables -A FORWARD -p TCP –dport 5000:5010 -j REJECT

# iptables -A FORWARD -d cs.yahoo.com -j REJECT
# iptables -A FORWARD -b scsa.yahoo.com -j REJECT

IPTABLES - blocking IPs simplified

You can block an IP from IPTABLES by using
iptables -I INPUT -s 192.168.0.88 -j DROP
You can simplify things a little bit by using a shell script and a predefined text file containing the IPs we want to be blocked. Either create a new file or add the following at the end of the script which activates the firewall:
#!/bin/sh

for i in $(< bad_hosts.lst) ; do
iptables -I INPUT -i eth1 -s “$i” -j DROP
done

Now create a new file in the same directory and name it bad_hosts.lst and add a new IP to be blocked on every single line, like in the example below:
192.168.2.99

192.168.2.67
86.138.2.7

Check your laptop battery in Linux

If you run Linux off a laptop, you might want to check your battery status alt least once a year:
grep -F capacity: /proc/acpi/battery/BAT0/info
This will output something like
design capacity:         7800 mAh
last full capacity:      6414 mAh

Speed up Samba network access

Dropt these lines into your smb.conf file to speed up Samba access. Find the Global area section and paste them underneath:
read size = 65536

read prediction = true
socket options = TCP_NODELAY SO_RCVBUF=8192 SO_SNDBUF=8192

Depending on your network card and configuration, this should speed up your LAN transfers at least tenfold.

Accessing Samba shares through SSH

Accessing Samba shares through SSH

1diggdigg
In Linux, you can access Samba shares by using a SSH prompt. We need a host PC (65.219.4.23) and a destination PC (192.168.0.81). We’ll use jack as a username but first we’ll create a new mount directory:
mkdir -p /samba/share
Now we connect to it:
ssh -N -L 139:192.168.0.81:139 jack@65.219.4.23 jack@65.219.4.23
Now we do a
umount /samba/share
/bin/mount -t smbfs -o username=jack,workgroup=workgroup_name,password=user_password,
port=139,dmask=770,fmask=660,netbiosname=homecpu
//localhost/share /samba/share

Change your MAC address in Linux

If you wish to change your MAC address in Linux, all you have to do is bring the interface down then use the hw ether switch:
ifconfig eth0 down
ifconfig eth0 hw ether 02:01:02:03:04:08
ifconfig eth0 up

Linux and website design

So you want to develop your website using Linux and you?re not sure if you’ll find the right tools you might need. Don’t worry, this article will get you rolling in no time.
There’s not such a large array of tools available for Linux website development, but the ones already here are doing a good job so far. Take Aptana Studio for example. It includes capabilities to build web applications using HTML, CSS and JavaScript and is totally free. Kompozer would be a second option if you wish for someting WYSIWYG.
If however you’d like something old-school, code-ready, try Quanta Plus. It also works great for editing files directly over FTP. VIM, Bluefish, SciTE and gedit they all have CSS and HTML/PHP syntax highliting.
There’s a tool for all your needs when it comes to webdesign in Linux. Create your images with GIMP or Inkscape, create image maps with KImageMapEditor and check for broken links with KLinkStatus.
As for content management systems, you can use a large variety of CMS’s, from Wordpress to Drupal to Joomla - all open-source, all with a decent background of usage behind them.
While GIMP and Inkscape can be very useful in creating your images, one of the best tools in batch-manipulating them is ImageMagick. The commands available in ImageMagick can convert, resize, watermark, edit images without the need of an X server. So if you have a lot of images to process and they’re already uploaded on the server, just use SSH and convert them using ImageMagick. Most servers offer ImageMagick capabilities.
Let’s say for example you have three folders on your servers: london website design
To edit the width of the images in the third folder, to a
cd design
then
mogrify -resize 800 *
This will set the width of all the image files in that folder to 800px, while keeping aspect ratio. When you have to deal with 4GB of images that need downloading, converting and re-uploading, SSH and ImageMagick cand be both a real time-saver.
If you have a HTML-only website, you can craft a script to monitor a certain folder for new images, then convert them all to a specific size. This way, you can bluk upload them to that folder and not worry about pre-processing. Let the server do the work for you.

Reset the MySQL password

You forgot your MySQL password. No problem, you can recover it easily. Stop the MySQL service with
# /etc/init.d/mysql stop
…and restart it without a password:
# mysqld_safe –skip-grant-tables &
You’ll get an output similar to [1] 5958. Now press Enter and type the following one after the other:
# mysql -u root

mysql> use mysql;
mysql> update user set password=PASSWORD(”NEW-ROOT-PASSWORD”) where User=’root’;
mysql> flush privileges;
mysql> quit
# /etc/init.d/mysql restart

It’s all done now and you should be able to login with the new password.

Install Firefox 4.0 in Ubuntu 10.10 via apt

The easiest way to install the latest version of Firefox in your Ubuntu is by launching the following command:
sudo add-apt-repository ppa:mozillateam/firefox-stable && sudo apt-get update && sudo apt-get install firefox
This will update your current version of Firefox to 4.0.

Wednesday, December 14, 2011

Tips To Ask For A Raise In Salary

Are you upset about the low salary you're getting? And you're planning to talk about a hike in your salary to your boss but, you don't know how to start the conversation. Negotiating your salary can be difficult when not handled well; it later causes stress and makes you feel low. Plan and prepare yourself well so as not to repent that you wasted your golden chance. A successful negotiation will help you to build confidence and get maximum salary possible. There are many constructive ways to ask for a salary raise. Here are few tips on how you can handle the situation and ask for increase in your salary.
 
Be at ease while negotiating salary

While addressing your request for a raise be at ease and relax your mind. Don't feel shy, you're just asking for what your worth. Tell your supervisor the reasons for your raise in salary. You can say that you have worked well and its time you raise the pay or due to inflation and the standard of living high salary would be helpful, or about the responsibility you have to manage your family. Whatever the reason may be you prepare well with get ready with your documents to show them.
 

Wednesday, December 7, 2011

Free eBook Creators to Create eBooks Free

Here are 3 Free ebook creators to create ebooks for free. These free ebook creation software are easy to use, and completely free.

MobiPocket Creator

MobiPocket Creator is free ebook creator which enables you to add quick HTML tags and image file to your publication. The application is equipped with tables of contents Wizard for you to automatically generate links to the chaps of your ebook along with smart heading extraction.  MobiPocket Creator is free software and includes the Mobipocket Emulator to test and preview the eBooks that you create.


 Some of the features of this free ebook creator:
  • You can create ebooks with this application within few clicks, thus application saves your time and provide professional level ebook creation. * Add personalized cover page to your ebook.
  • There are three levels of security provided to your created ebook- no encryption, encrypted and password protection.
  • Preview your ebooks in your PC for test read and make changes immediately.
  • Import already existing word or text file which is automatically gets converted in HTML files preserving all the formatting done in word file. You can also import PDF document to MobiPocket Creator.
This e-book creator provides overall solution for creating impressive ebooks whether for personal use of for distribution purpose. The very unique feature of the application is its table of contents wizard. The table of contents is essential part of the book as it helps reader to understand content of the book. The application has in built wizard to help you out when you don’t have tables of contents in your book. Just run the wizard and it will extract the heading of the chapters of the ebook based on HTML tags detections.
Also personalize cover page of your e-book using this application and add pictures in various formats. On adding pictures, the image automatically gets converted into the optimal format and size for the PDA screen. Download Mobipocket Creator here.


NATATA eBook Compiler:

NATATA ebook compiler is free and powerful ebook compiler that supports various file formats like HTML, CSS, WAV, TXT, GIF, JPG, MID, JavaScript, DHTML, Flash, PDF, etc and converts them into single compact exe file which has ebook like interface. Create intuitive and ebooks with this application without wasting much time and in few easy steps. This ebook creator will provide your step by step guide to compile ebooks in whole process.


Its key benefits are:
  • You can create light weight and portable ebooks with this application and they are ready to be distributed through various modes in CDs, via internet and uploads or as an email attachments.
  • The program comes with built in compression alogorithm.
  • The ebook creator is absolutely free; you can create unlimited numbers of ebook copies.
  • Open your eBooks directly from the eBook file without temporal folders. You can protect your books with password with a fixed Password. Define copyright protection on your ebooks so that no one has right to use right-button mouse, copy / paste, or view code.
  • Choose the look of your publication with this free ebook creator. You’ll be able to choose how your publication will look like and make the toolbar fully configurablefor operations- search, print, back, next, about, exit. Add full author information in the about box of the ebook creator adding all the relevant info about the author giving details of the author to the readers.
  • Also add in built search engine in your ebook.
This free ebook creator help you to create ebooks by compressing various file formats into one executable file format. Thus if you have some content that are available in more than one format then you need not convert each part of the contents separately. This application will convert various formats into one in single click. There is small viewer in the application that selected start document in an ebook like interface. The free version of the NATATA eBook Compiler can create ebooks of 50 pages. Download NATATA eBook Compiler here.

Zinepal:

Zinepal is free ebook creator which converts existing web page contents, feeds and log contents into printable PDF formats and ebooks in the ePub, Amazon Kindle and Mobipocket formats. Create easy ebooks from the web pages with this application within few steps.
You can start creating ebooks just by entering web addresses in the application and it will start creating ebooks. You can add number of links of websites, feeds and blog page to include them into your ebooks. By entering the URL of the blogs and feeds in the application, the application will direct you to the URL using your internet connection and you can select articles, stories and event descriptions of your choice to be included in the ebook.

If you don’t want to use any links or page contents than you can also start creating blank ebook without using any links. If you enter a blog or feed, then Zinepal displays a list of stories. Select the checkbox next to a story to add it to your eBook. The story selected by you will add to your ebook content. Thus you need not rewrite whole episode and your time is saved.

You can also preview your ebook after compilation. Create ebook with all necessary requirement using this ebook creator and then just press Preview tab located on the head of the page to preview your ebook. Zinepal then creates a preview of your eBook.

When you have previewed your ebook, you can make changes in the copy by clicking to customize ebook tab below the preview window. After you have compiled final compilation finalize your ebook into PDF, ePub and Kindle/Mobipocket formats. Another interesting feature of creating ebook with this application is, you can easily update your ebooks with Zinepal.

When you finalize your ebook, you can check the regular delivery option checkbox. Use this option to receive updates on the story added by you in your ebook by entering blogs and feeds and up-to-date your ebooks with new topics and stories. Specify the number of stories you would like to receive in the new ebook compiled automatically by this application along with interval days. Try Zinepal here.