Tuesday, January 31, 2012

Oriental Insurance Company Ltd Recruitment for Librarian

The Oriental Insurance Company Ltd.
( A Government of India Undertaking )

Head Office, Oriental House, A-25/27, Asaf Ali Road, New Delhi-110002

(APPLICATIONS ARE TO BE SUBMITTED ON-LINE ONLY)
(LAST DATE FOR SUBMISSION OF APPLICATION IS 13.02.2012)


H – 08 – Librarian

Education Qualification:

Candidates should have a degree in bachelor in Library Science/Information Science Documentation with minimum 60% or Masters Degree in Library Science/Information Science Documentation with 55% marks along with 3 years experience as a Librarian (2 years experience for SC/ST candidates) to apply for Oriental Insurance Company Librarian recruitment 2012.
For more details : http://www.oiclao2012.com/


Information Executive - Librarian - Delhi, Delhi-NCR

From Development Alternatives Group


The Librarian is responsible for providing library and research services for the organization and maintenance of the library and its collections. He/She is required to manage the planning, administrative and budgetary functions of library and information services on a proactive basis. Also expected to provide effective access to library collections and resources and give library services in response to the information needs of library users. He/she should be able to interact with other libraries and resources centres and have a dissemination protocol. He/she should be able to maintain databases and link with the mission of the organisation.
Salary range:  ₨ 2,40,000 - ₨ 3,00,000 / Yearly (Gross) (Gross Pay) 
Job type: Full time
Position type: Permanent
Vacancies:1
Minimum experience: Between three and five years

Requirements

Qualifications required – M.L.I.Sc. (Library Science)

Experience Required -

1) Experience of about 5-6 years , preferably in a library of repute

2) Well versed with computer and quick learner.

3) Should have good English speaking and writing skills.

4) Should have good knowledge of:
• library policies, procedures, methods, systems. programming, ethics and professional standards
• research and information gathering systems and methods including the use of electronic resources
• a variety of information database systems and electronic information database systems
• conducting Internet searches
• library software and other related software (Knowledge of ‘Alice for the Windows’ software would be an added advantage)
• ability to index the data files on computer
• experience working in bibliographic and acquisitions operations of an online library management system and in cataloguing and classifying to a professional data base

Post of Library clerk @ Staff Selection Commission

SSC Eastern Region Recruitment 2012 – Various Vacancies: Staff Selection Commission – SSC (Eastern Region) has issued notification for the recruitment of various vacancies in kolkata. Eligible candidates may apply through prescribed application format on or before 27-02-2012 up to 5.00 PM. Particulars about age limit, educational qualification, no of posts and other are mentioned below…
SSCER Vacancy Details:
No of Posts: 06 Posts
Name of the Posts:
1. Library Clerk (Reprography): 01 Post
2. Library Clerk (General): 05 Posts
Age Limit & Educational Qualification: Candidates may see Advt details for more details regarding age limit & educational qualifications for each post.
Application Fee: Rs 50/- for General candidates (No fee for SC-ST-PH-EXSM-Women candidates). Pay fee through CRFs available in post offices. Get cancellation of the recruitment fee stamps pasted on the application form in the space given.
How to apply: Eligible candidates may send their application in prescribed format, along with CRFs, recent passport size photograph pasted on application form, attested photo copies of all necessary certificates to the following address, Regional Director, Staff Selection Commission (ER), 234/4, AJC Bose Road, Nizam Palace, Ist MSO Building, 8th Floor, Kolkata-700020, on or before 27-02-2012
Last date for receipt of application: 27-02-2012 (For remote areas 05-03-2012), up to 5.00 PM.
For more particulars about age limit, educational qualification, pay scale, no. of posts, experience, application fee, how to apply, application format, selection procedure, last date for receipt of application and other particulars available at below given link…


Tuesday, January 24, 2012

Dewey (Free) From Android Library Market


Dewey (Free)

Dewey


The Dewey decimal codes in an easy off-line app
A simple reference for the Dewey decimal library codes. Easy to use off-line app. This data can also be managed by the paid for RefLibrary application 

Screenshots

  • Screenshot
  • Screenshot


Download


Assistant Librarian I (Subject Librarian - Humanities & Social Sciences)


Company Name: CITY UNIVERSITY OF HONG KONG

Worldwide Search for Talent

City University of Hong Kong is a dynamic, fast-growing university that is pursuing excellence in research and professional education. As a publicly-funded institution, the University is committed to nurturing and developing students' talent and creating applicable knowledge to support social and economic advancement. Currently, the University has six Colleges/Schools. Within the next two years, the University aims to recruit 100 more scholars from all over the world in various disciplines, including science, engineering, business, social sciences, humanities, law, creative media, energy, environment, and other strategic growth areas.

Applications are invited for:

Duties : Develop, manage and evaluate the Library collection. The appointee is expected to engage in a variety of services, including providing relevant information and reference services, planning orientation and user education activities, compiling subject guides and pathfinders, liaising with faculty and institutions, organizing academic exchange and outreach functions, devising promotional displays, providing current awareness services, and participating in committee work. The appointee is also required to provide training to support staff to help transform their skills from function-based to subject-based.
(Additional information about the post is available at http://www6.cityu.edu.hk/hro/en/job/current/administrative.asp)

Requirements :
A good honours degree in relevant disciplines plus a recognized post-graduate professional qualification in Librarianship and Information Science (MLS or equivalent). At least five years' experience at the level of Assistant Librarian II is required for the appointment as Assistant Librarian I.
(Further enquiries can be directed to Ms. Sheena SHUM of Library at email: sheena.shum@cityu.edu.hk.)

Salary and Conditions of Service
Initial appointment will be made on a fixed-term contract. Remuneration package will be highly competitive, commensurate with qualifications and experience. Fringe benefits include gratuity, leave, medical and dental schemes, and housing benefits (where applicable).

Information and Application
Additional information on the posts and application form is obtainable (a) from the University's homepage at http://www.cityu.edu.hk, or (b) by mail with a self-addressed stamped envelope from the Human Resources Office, City University of Hong Kong, Tat Chee Avenue, Kowloon, Hong Kong, or (c) in person from the Reception Counter, Human Resources Office. The closing date is 18 February 2012. Please quote the reference of the post in the application and on the envelope. Applications will receive full consideration. The University reserves the right not to fill the positions. Personal data provided by applicants will be used strictly in accordance with the University's personal data policy, a copy of which will be provided upon request.

The University also offers a number of visiting positions through its "CityU International Transition Team" for current graduate students and for early-stage and established scholars, as described at http://www.cityu.edu.hk/provost/cityu_international_transition.htm.

City University of Hong Kong is an equal opportunity employer and we are committed to the principle of diversity. We encourage applications from all qualified candidates, especially those who will enhance the diversity of our staff.

City University of Hong Kong was ranked the 110th among the world's top universities and the 15th in Asia according to the Quacquarelli Symonds 2011 surveys.

http://www.cityu.edu.hk

Systems and e-Librarian

Khalifa University of Science Technology and Research     
 

Position: Systems and e-Librarian

Industry Type :Education / Training / Teaching 

Functional Area: IT - Software

Location of Job :   Abu Dhabi - United Arab Emirates 

Job Summary : The position is responsible for implementing and managing library systems, resource access mechanisms, and control mechanisms for online resources. Responsibilities also include using technology to reach students, set up repositories, and provide multimedia support. Serves as liaison with IT and ILC . Duties and Responsibilities Manages system implementation for all library systems Implements Millennium ILS (integrated library system) and maintains system after implementation Oversees coordination with Banner for regular downloads of employees and students Implements new modules such as ACQ , ILL , ERM (acquisitions, interlibrary loan, electronic resources management) Develops linking systems from catalog record to online resources Manages online access Implements systems such as Serials Solutions Implements and manages meta-searching (like Summon) across all online resources Manages electronic resources, tracking contracts, renewals, use restrictions, statistics, contacts, access control, etc. Develops multimedia production/presentation facility and provide assistance with software Develops a repository for placing Khalifa University intellectual content online Develops technologies in delivering resources and providing virtual assistance to users Serves as liaison to IT and to ILC . 

Desired Candidate's Profile

Experience Minimum two years experience as professional librarian in academic libraries required. Experience implementing integrated library systems required, Millennium preferred. Experience in sci/tech libraries preferred. Demonstrated interest in academic research and teaching environment. Demonstrated knowledge of resources and information-seeking skills in the sci/tech disciplines. Demonstrated ability to communicate effectively, orally and in writing, with students, faculty, and librarian peers. Demonstrated positive interpersonal skills and client service orientation. Demonstrated ability to organize and manage projects, work under stress and meet deadlines. Demonstrated flexibility, skill at multi-tasking, taking initiative, being creative. Demonstrated potential to contribute to profession through research, publishing, teaching, or professional service. Computer Skills MS Office applications. Library technical services (cataloguing, classifying) and electronic searching tools. Web skills, including use of Web 2.0 technologies for reaching students Technical Skills.

Experience : 2 - 5 years  

Education: MLISc

Website  https://khalifauniversity.peopleadmin.com/postings/429


Tuesday, January 17, 2012

Librarian Opportunities


Librarian
Arya Girls Sr. Sec. School - Delhi, Delhi

Required Female (S.C)
Age limit & Educational Qualification, Pay scale & other service conditions are same.

As per applicable to Govt. Schools of NCT of Delhi. Apply with attested Copies by Gazetted officer of all Certificates within 15 days.

Through Regd. Post or by Hand. Time 10 am to 12 noon.
School Address :
Arya Girls Sr. Sec. School
12/15, W.E.A., Reghar Pura, Karol Bagh, New Delhi - 110005. 


Senior Librarian
Delhi Public School - Gurgaon, Haryana

Applications are invited from qualified candidates with public school experience, excellent communication skills and proficiency in computer skills.

Pay and allowances as per the DPS Society/ Government Norms apply. Higher start to deserving candidates.

Apply within 10 days on prescribed form available at school reception from 9 am to 2 pm on payment of Rs. 150/-

Only shortlisted candidates will be called for interview.
Note : The Management reserves the right to cancel any post.

School Address :
Delhi Public School
Sushant Lok ( Under the Aegis of the DPS Society, New Delhi)
Block-B, Phase -1, Sushant Lok, Gurgaon, Haryana - 122002
Tel : ( 0124) 4041221, 4041441 Fax No : 4041331 , Website : www.dpssl.net


Librarian job openings in Bengal Engineering and Science University
Howrah, West Bengal 
A Master's Degree in Library Science/ Information Science / documentation with at least 55% marks or its equivalent grade of B in the UGC seven points scale and consistently good academic record set out in these Regulations.

At least 13 years' as a Deputy Librarian in a University library or 18 years' experience as a College Librarian.

Evidence of innovative library service and organization of published work.

M. Phil / Ph.D Degree in library science / information science / documentation / archives and manuscript-keeping is desirable.

Check here for more detailed information http://www.becs.ac.in

The Registrar, Bengal Engineering and Science University, Shibpur, Howrah-3, West Bengal.

Official notification, prescribed application format, bio-data form for various job openings in Bengal Engineering and Science University, West Bengal Search here for over 24,000 government, public and private sector jobs all at one place 


Library Personnel
University Library G. B. Pant University of Agriculture & Technology, Pantnagar-263145

Application is invited for the position of Library Personnel. The details are as follows:

Library Personnel

No. of posts : 03

Qualification : Master’s degree in Library Science / Information Science / Documentation or an equivalent professional degree with at least 55% marks or its equivalent grade of 55% marks where grading system is practiced and a consistently good academic record with knowledge on computerization of library

Pay : Rs. 16,000/- per month

Library Personnel will be engaged for 179 days. The engagement will be terminated automatically if the regular selection is made on the post against which Library Personnel is engaged. The candidates should apply on plain paper with the following information to University Librarian, G.B. Pant University of Agriculture & Technology, Pantnagar latest by January 31, 2012 up to 5.00 P.M. 
Website :http://www.gbpuat.ac.in/ 


Monday, January 16, 2012

MySQL Database Security Tips

The MySQL database has become the world's most popular open source database because of its consistent fast performance, high reliability and ease of use. This document is intended as a quick security manual to help you bring an installed MySQL database server into conformity with best security practices.

1. Secure your server

  • Install Antivirus and Antispam software
  • Configure the operating system’s firewall
  • Consider the safety of your server's physical location
  • Install the services you intend the machine to run
  • Harden the production server and services
  • Disable unnecessary services
  • Follow services vendors’ recommendations regarding patches and updates needed for the safe and secure operation of their services

2. Disable or restrict remote access

Consider whether MySQL will be accessed from the network or only from its own server.
If remote access is used, ensure that only defined hosts can access the server. This is typically done through TCP wrappers, iptables, or any other firewall software or hardware available on the market.
To restrict MySQL from opening a network socket, the following parameter should be added in the [mysqld] section of my.cnf or my.ini:

skip-networking 
The file is located in the "C:\Program Files\MySQL\MySQL Server 5.1" directory on the Windows operating system or "/etc/my.cnf" or "/etc/mysql/my.cnf" on Linux.

This line disables the initiation of networking during MySQL startup. Please note that a local connection can still be established to the MySQL server.
Another possible solution is to force MySQL to listen only to the localhost by adding the following line in the [mysqld] section of my.cnf

bind-address=127.0.0.1

You may not be willing to disable network access to your database server if users in your organization connect to the server from their machines or the web server installed on a different machine. In that case, the following restrictive grant syntax should be considered:

mysql> GRANT SELECT, INSERT ON mydb.* TO 'someuser'@'somehost';

3. Disable the use of LOCAL INFILE

The next change is to disable the use of the "LOAD DATA LOCAL INFILE" command, which will help to prevent unauthorized reading from local files. This is especially important when new SQL Injection vulnerabilities in PHP applications are found.
In addition, in certain cases, the "LOCAL INFILE" command can be used to gain access to other files on the operating system, for instance "/etc/passwd", using the following command:

mysql> LOAD DATA LOCAL INFILE '/etc/passwd' INTO TABLE table1

Or even simpler:

mysql> SELECT load_file("/etc/passwd")

To disable the usage of the "LOCAL INFILE" command, the following parameter should be added in the [mysqld] section of the MySQL configuration file.

set-variable=local-infile=0

4. Change root username and password

The default administrator username on the MySQL server is "root". Hackers often attempt to gain access to its permissions. To make this task harder, rename "root" to something else and provide it with a long, complex alphanumeric password.
To rename the administrator’s username, use the rename command in the MySQL console:

mysql> RENAME USER root TO new_user;

The MySQL "RENAME USER" command first appeared in MySQL version 5.0.2. If you use an older version of MySQL, you can use other commands to rename a user:

mysql> use mysql;
mysql> update user set user="new_user" where user="root";
mysql> flush privileges;

To change a user’s password, use the following command-line command:

mysql> SET PASSWORD FOR 'username'@'%hostname' = PASSWORD('newpass');

It is also possible to change the password using the "mysqladmin" utility:

shell> mysqladmin -u username -p password newpass

5. Remove the "test" database

MySQL comes with a "test" database intended as a test space. It can be accessed by the anonymous user, and is therefore used by numerous attacks.
To remove this database, use the drop command as follows:

mysql> drop database test;

Or use the "mysqladmin" command:

shell> mysqladmin -u username -p drop test

6. Remove Anonymous and obsolete accounts

The MySQL database comes with some anonymous users with blank passwords. As a result, anyone can connect to the database To check whether this is the case, do the following:

mysql> select * from mysql.user where user="";

In a secure system, no lines should be echoed back. Another way to do the same:

mysql> SHOW GRANTS FOR ''@'localhost';
mysql> SHOW GRANTS FOR ''@'myhost';

If the grants exist, then anybody can access the database and at least use the default database "test". Check this with:

shell> mysql -u blablabla

To remove the account, execute the following command:

mysql> DROP USER "";

The MySQL "DROP USER" command is supported starting with MySQL version 5.0. If you use an older version of MySQL, you can remove the account as follows:

mysql> use mysql;
mysql> DELETE FROM user WHERE user="";
mysql> flush privileges;

7. Lower system privileges

A very common database security recommendation is to lower the permissions given to various parties. MySQL is no different. Typically, when developers work, they use the system's maximum permission and give less consideration to permission principles than we might expect. This practice can expose the database to significant risk.
* Any new MySQL 5.x installation already installed using the correct security measures.
To protect your database, make sure that the file directory in which the MySQL database is actually stored is owned by the user "mysql" and the group "mysql".

shell>ls -l /var/lib/mysql

In addition, ensure that only the user "mysql" and "root" have access to the directory /var/lib/mysql.
The mysql binaries, which reside under the /usr/bin/ directory, should be owned by "root" or the specific system "mysql" user. Other users should not have write access to these files.

shell>ls -l /usr/bin/my*

8. Lower database privileges

Operating system permissions were fixed in the preceding section. Now let’s talk about database permissions. In most cases, there is an administrator user (the renamed "root") and one or more actual users who coexist in the database. Usually, the "root" has nothing to do with the data in the database; instead, it is used to maintain the server and its tables, to give and revoke permissions, etc.
On the other hand, some user ids are used to access the data, such as the user id assigned to the web server to execute "select\update\insert\delete" queries and to execute stored procedures. In most cases, no other users are necessary; however, only you, as a system administrator can really know your application’s needs.
Only administrator accounts need to be granted the SUPER / PROCESS /FILE privileges and access to the mysql database. Usually, it is a good idea to lower the administrator’s permissions for accessing the data.
Review the privileges of the rest of the users and ensure that these are set appropriately. This can be done using the following steps.

mysql> use mysql;

[Identify users]

mysql> select * from users;

[List grants of all users]

mysql> show grants for ‘root’@’localhost’;

The above statement has to be executed for each user ! Note that only users who really need root privileges should be granted them.
Another interesting privilege is "SHOW DATABASES". By default, the command can be used by everyone having access to the MySQL prompt. They can use it to gather information (e.g., getting database names) before attacking the database by, for instance, stealing the data. To prevent this, it is recommended that you follow the procedures described below.
  • Add " --skip-show-database" to the startup script of MySQL or add it to the MySQL configuration file
  • Grant the SHOW DATABASES privilege only to the users you want to use this command
To disable the usage of the "SHOW DATABASES" command, the following parameter should be added in the [mysqld] section of the /etc/my.cnf:
[mysqld]
skip-show-database

9. Enable Logging

If your database server does not execute many queries, it is recommended that you enable transaction logging, by adding the following line to [mysqld] section of the /etc/my.cnf file:

[mysqld]
log =/var/log/mylogfile

This is not recommended for heavy production MySQL servers because it causes high overhead on the server.
In addition, verify that only the "root" and "mysql" ids have access to these logfiles (at least write access).
Error log
Ensure only "root" and "mysql" have access to the logfile "hostname.err". The file is stored in the mysql data directory. This file contains very sensitive information such as passwords, addresses, table names, stored procedure names and code parts. It can be used for information gathering, and in some cases, can provide the attacker with the information needed to exploit the database, the machine on which the database is installed, or the data inside it.
MySQL log
Ensure only "root" and "mysql" have access to the logfile "*logfileXY". The file is stored in the mysql data directory.

10. Change the root directory

A chroot on Unix operating systems is an operation that changes the apparent disk root directory for the current running process and its children. A program that is re-rooted to another directory cannot access or name files outside that directory, and the directory is called a "chroot jail" or (less commonly) a "chroot prison".
By using the chroot environment, the write access of the MYSQL processes (and child processes) can be limited, increasing the security of the server.
Ensure that a dedicated directory exists for the chrooted environment. This should be something like: /chroot/mysql In addition, to make the use of the database administrative tools convenient, the following parameter should be changed in the [client] section of MySQL configuration file:

[client]
socket = /chroot/mysql/tmp/mysql.sock

Thanks to that line of code, there will be no need to supply the mysql, mysqladmin, mysqldump etc. commands with the --socket=/chroot/mysql/tmp/mysql.sock parameter every time these tools are run.

11. Remove History

During the installation procedures, there is a lot of sensitive information that can assist an intruder to assault a database. This information is stored in the server’s history and can be very helpful if something goes wrong during the installation. By analyzing the history files, administrators can figure out what has gone wrong and probably fix things up. However, these files are not needed after installation is complete.
We should remove the content of the MySQL history file (~/.mysql_history), where all executed SQL commands are stored (especially passwords, which are stored as plain text):

cat /dev/null > ~/.mysql_history

12. Patch your systems

Consult you operation system’s vendor for security and performance updates: use windows update on windows, apt-get or yum on (Debian) systems, Red Hat update Agent on Red hat and so on.


Sunday, January 15, 2012

Having technical problems accessing an online article in a database or e-journal? Try these tips and tricks.

Try a different browser

Internet Explore works best for MOST databases, while it won't work properly in others. The same is true with Firefox, Google Chrome and Safari. Also, make sure you have an up-to-date browser. Often databases don't support older versions of browsers. If you are using a Mac, try using Safari. Try accessing the resource with a different browser and see if you get the same error. Some popular browsers are: Mozilla Firefox, Internet Explorer, Opera, Chrome, or Safari. **Please do not uninstall your original browser after downloading an alternate browser.**

Clear your cache

Try clearing your cache and re-starting your browser this solves many problems.
Clearing Cache Instructions
Cache is a local storage area in your browser in which previously viewed web pages and images are stored. If a previously viewed web page is accessed again, the copy is loaded from the cache. To ensure that the current copy is loaded from the server and not from the cache, clear the cache in your browser and load the page again. Clearing your cache can also improve the speed and performance of your browser.

Firefox
  1. Select Tools and select Options.
  2. Click the Advanced icon and click the Network tab.
  3. Click Clear Now under the Cache section.
  4. Click OK.
  5. Exit and re-launch the browser.
Internet Explorer
  1. Select Tools from the top menu
  2. Choose Internet Options
  3. Click the General tab.
  4. Click Delete under the Browsing History section.
  5. Click Delete Files in the Delete Browsing History dialog box.
  6. Click OK.
  7. Click Close.
  8. Close and re-launch your browser.
Safari 
  1. Click the Safari menu and select Empty Cache.
  2. Click Empty on the Are you sure message box.
  3. Exit and re-launch the browser.
Firefox
  1. Click the Firefox menu and select Preferences.
  2. Click the Advanced icon and click the Network tab.
  3. Click Clear Now under the Cache section.
  4. Click the X in the top left corner to close the Advanced window.
  5. Exit and re-launch the browser.

Allow cookies

Check to be sure your browser is set to accept cookies. Many databases require the use of cookies and won't work if they are blocked.
A cookie is a file created by a web site that stores information on your computer, such as site-specific preferences when visiting that site. Some sites may not work properly when cookies are disabled.

Firefox
  1. Select Tools from the top menu.
  2. Select Options.
  3. Click the Privacy icon at the top.
  4. In the Cookies section, check the box corresponding to "Accept cookies from sites ".
  5. Click "OK" to save changes.
Internet Explorer
  1. Select Tools from the top menu
  2. Choose Internet Options
  3. Click on the Privacy tab
  4. Click the ‘Default' button
  5. Click ‘Apply' and "OK".
Safari 
  1. Click the Safari menu item, and click Properties. A new window will pop-up.
  2. Click the Security icon in the menu bar of the pop-up window.
  3. Make sure that Accept Cookies is set to either ‘Always', or 'Only from sites you navigate to'.
Firefox
  1. Click the Firefox menu, then click Preferences.
  2. In the left-hand column, click the icon labeled Privacy.
  3. Click Cookies, then click the option labeled "Allow sites to set cookies.
  4. Click OK to save changes and close the dialog box.

Deleting Cookies

Firefox
  1. Click Tools and select Options.
  2. Click the Privacy Icon.
  3. Click Show Cookies under the Cookies section.
  4. Click Remove All Cookies and click Close.
  5. Click OK.
  6. Close and re-launch your browser.
Internet Explorer
  1. Select Tools from the top menu
  2. Choose Internet Options
  3. On the General tab, click Delete under Browsing History in the Internet Properties dialog box.
  4. In the Delete Browsing History dialog box, click Delete Cookies.
  5. In the Delete Cookies dialog box, click Yes.
Safari
  1. Click the Safari menu and select Preferences.
  2. Click the Security icon and click Show Cookies.
  3. Click Remove All.
  4. Click Remove All on the Are you sure message box.
  5. Click Done.
  6. Click the X in the top left corner to close the Security window.
  7. Close and re-launch your browser.
Firefox
  1. Click the Firefox menu and select Preferences.
  2. Click the Privacy icon.
  3. Click Show Cookies under the Cookies section.
  4. Click Remove All Cookies.
  5. Click the X in the top left corner to close the Cookies window.
  6. Click the X in the top left corner to close the Privacy window.
  7. Close and re-launch your browser.

Adjust pop-up blocker settings

A few databases require the use of pop-ups to deliver some of their content. If you have pop-up blocker enabled on your web browser, you may need to disable it.

Firefox
  1. Click Tools in the Menu Bar
  2. Select Options
  3. Click the Content tab
  4. Check the box associated with Block pop-up windows.
  5. Click OK to save your changes
Internet Explorer
  1. Click the Tools menu item.
  2. Click the Pop-up Blocker option.
  3. Click Turn Off Pop-up Blocker
Safari
  1. Click Safari menu
  2. Uncheck Block Pop-Up windows
Firefox
  1. Click Firefox menu, select Preferences
  2. When the Preferences open, select the Content icon.
  3. Uncheck the Block Pop-ups windows.
  4. Reload the current page

Enable Javascript

JavaScript is a scripting language commonly used to make web pages interactive. Disabling JavaScript may cause some sites to not work properly.

Firefox
  1. Select Tools from the top menu
  2. Choose Options
  3. Click the Content icon at the top
  4. Select the checkbox next to Enable JavaScript and click OK
Internet Explorer
  1. Select Tools from the top menu
  2. Choose Internet Options
  3. Click on the Security tab
  4. Click on Custom Level
  5. Scroll down until you see section labeled Scripting
  6. Under Active Scripting select Enable and click OK
  7. Click the OK button to close the Internet Options window
Safari
  1. Click the Safari menu item, and click Properties. A new window will pop-up.
  2. Click the Security icon in the menu bar of the pop-up window.
  3. Make sure the boxes next to Enable JavaScript and are checked.
Firefox 
  1. Click on the Firefox menu, and select Preferences
  2. Click on Content icon
  3. Make sure that Enable JavaScript is selected

Enable Java

Java is a popular programming language for the Web used to create interactive or animated web content. Disabling Java may cause some sites to not work properly.

Firefox
  1. Choose Tools from the Menu bar, then Options.
  2. In the Options dialogue, select the Content icon and make sure both the Enable JavaScript and Enable Java check boxes are selected.
  3. Click the OK button.
Internet Explorer
  1. Click Tools select Internet Options
  2. Select the Advanced Tab, and scroll down to "Java (Sun)"
  3. Check the box under Java (Sun)
  4. Next, select the Security Tab, and select the "Custom Level" button
  5. Scroll down to "Scripting of Java applets"
  6. Make sure the "Enable" radio button is checked.
  7. Click OK to save your preference.
  8. Close and re-open your web browser.
Safari
  1. From the Safari menu, select Preferences
  2. When the Preferences open select the Security icon.
  3. Check the Enable plug-ins, Enable Java and Enable JavaScript checkboxes.
  4. Reload the current page
Firefox
  1. Click on the Firefox menu, and select Preferences
  2. Click on Content icon
  3. Make sure that Enable Java is select

Allow images


Firefox
Firefox should display images in web pages by default. To check your settings
  1. Click Tools in the Menu Bar
  2. Select Options
  3. Click the Content tab
  4. Check the box Load Images Automatically.
  5. Click OK to save your changes
Internet Explorer
  1. On the Tools menu, click Internet Options.
  2. Click the Advanced tab, and then verify that the Show Pictures check box is selected under Multimedia.
  3. Click OK.
Safari
  1. From the Safari menu, select Preferences
  2. When the Preferences open select the Appearance icon.
  3. Check the Display images when the page opens.
  4. Reload the current page
Firefox 3.x and Up for Mac
  1. From the Firefox menu, select Preferences
  2. In the left-hand pane, click Web Features
  3. Check the box Load Images Automatically.
  4. Click OK to save your changes

Firewall

 Remote access to databases from work or anywhere behind a firewall may not work. Sometimes the security settings on firewalls are such that authentication via proxy server is not possible. 

Thursday, January 12, 2012

EBSCO Publishing Calling MLISc candidates for the post of Bibliographic Database Designer

Bibliographic Database Designer


Department: Information Technology and Services 

Position Type: Full-Time Regular Apply Now
Experience: 2 years
Education: MLISc
Location: MA - Ipswich - EBSCO  Publishing 


EBSCO Publishing is entering its third decade as a leading provider of reference databases for students, library patrons, doctors, nurses, business people and researchers around the world. Always at the leading edge, we continue to work to identify new challenges and combine technology with data to meet the information needs of our customers worldwide. EBSCO Publishing, a division of EBSCO Industries, employs over 750 professionals in their Ipswich, MA headquarters.


Basic Function

Create detailed specifications for implementing bibliographic databases and associated features for EBSCO’s online bibliographic products.


Essential Functions


• Analyze business requirements plus third party and in-house data sources to determine the best method of implementing key features for new and existing products within the EBSCOhost environment.
• Write detailed technical database design specifications that instruct software developers how to map bibliographic data sources to EBSCO’s proprietary format; includes writing instructions for mapping data to XML and to MARC21 formats.
• Generate descriptions of required indexing tables; specify search tags and search limiters; map fields for authority files; and specify the database display on EBSCO interfaces.
• Work closely with software developers and quality analysts on product configurations and complex data transformations to ensure accurate technical implementation of database functionality and appearance according to specifications.
• Provide troubleshooting support from a technical design perspective for existing products.


Required Qualifications

• Minimum of two years in the field of librarianship or bibliographic database development or design, including demonstrated experience creating or manipulating bibliographic data in a searchable database environment
•  Minimum of two years of demonstrated experience with web-based bibliographic database search and retrieval techniques
• Minimum of one year demonstrated experience with indexing methods as applied to bibliographic data
• Minimum of one year demonstrated understanding of MARC21 bibliographic format
• Minimum of one year demonstrated experience reading and understanding documents in XML format
• Minimum of one year demonstrated ability to balance multiple projects concurrently in a fast-paced, deadline-driven environment
• Master of Library Science degree


Preferred Qualifications


• Business analysis experience preferred, including project analysis, requirements production and management, process flow documentation
• Experience reading or writing XSLT preferred
• Ability to work well in a team environment
• Excellent technical communication skills, both verbal and written
• Excellent analytical skills and attention to detail
• Familiarity with standard bibliographic format standards (e.g. DUBLIN CORE, METS, MARC21) preferred

EBSCO Publishing offers free parking, a subsidized cafeteria, on-site fitness center with classes, free coffee and a dynamic working environment. We are conveniently located minutes from the Ipswich stop on the MBTA Newburyport rail line and offer full commuter rail reimbursement.

EBSCO Publishing is an equal opportunity employer and welcomes diversity in the workplace. EOE M/F/H/V 
For apply online Click here

Monday, January 9, 2012

PhpMyAdmin Tutorial

Click here for Installation of phpMyAdmin Tutorials


You can access your MySQL account using phpMyAdmin using the link provided to you --something like below
http://localhost/phpmyadmin
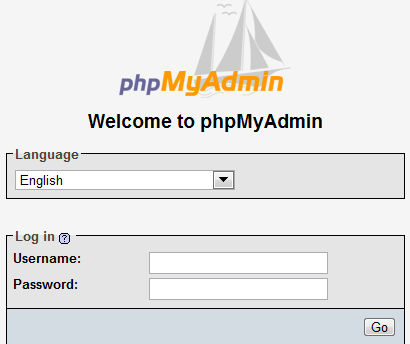
When you click on the link above, a dialog box will prompt you for a username and password. This will be the username and password given you when we set  it up for you.

Login screen

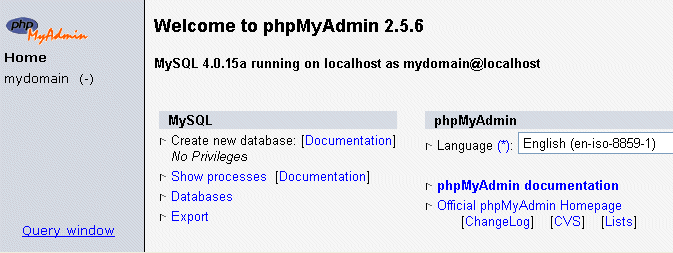
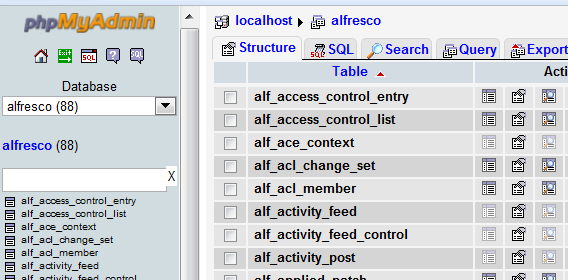
Once you log in, a phpMyAdmin screen appears as shown below.

phpMyAdmin welcome page

Creating a table in your database

The left-hand frame in phpMyAdmin is used for navigation.You will see your database displayed here (in this case called mydomain). As you create tables, they will show below this.
Click on your database the navigation frame and a new window will appear on the right hand side.

Creating a table

We will create a table in the database, called "people". Use the Create new table feature. Type in the name of the new table into the Name: people, and the number of columns in the table (4) into Fields:. This tutorial is only designed to show you the basic php/MySQL/phpMyAdmin functions. You can delete it using the Drop function. You will want to allow for growth in your table.

Defining fields

Click Go and you should see something like this. The table title now appears with under the database name.

table features

Now enter the names and attributes of our table fields. Enter the following information as above:


Field Type Length Default
Extra
id int 6 0
auto_increment
name char 100

telephone char 50

birthday char 50


The Length value indicates the maximum allowable length of characters for input. There are many different values that can be set for Type; see further documentation here. The Types specified in this example aren't the most efficient, but just used for the purposes of this exercise. The "id" field, which will be used as a Primary key for this table, has been set to auto_increment, saving you from having to having to type in the next number in sequence when you input records.  Set the Default to 0
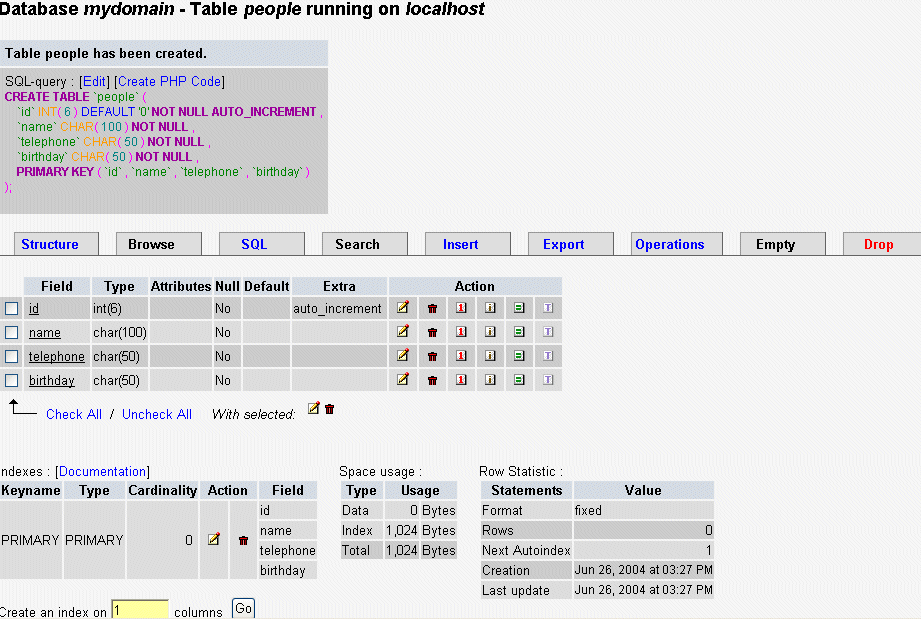
Once you've entered all the values, click Save. A screen like this will appear.

Table properties


Congratulations!-You have created your table! The corresponding SQL command for creating these fields is also displayed. This isn't needed but in time you will start to recognise MySql commands
Note that you can use Drop to delete a table or fields.
When you are ready we suggest you check out  all of the options on this page.
Inputting data into the table.
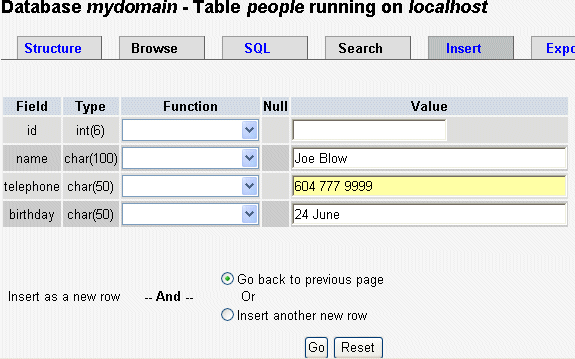
 Click the tab labeled "Insert" -  and another window should appear, like this.


Adding records


Now type in the details for each of the fields for this record. The "id" column was set to automatically increment so you do not need to enter a number.
Note - if you ever get lost with phpMyAdmin navigation  click "Home" in the left hand nav bar and start again.
Now click Save and the record is saved to the people table.
The previous window reappears with the SQL command for the insert. You can keep adding recordsby re-selecting Insert".
For multiple records, you can select the "Insert another new row" radio button on the input form.
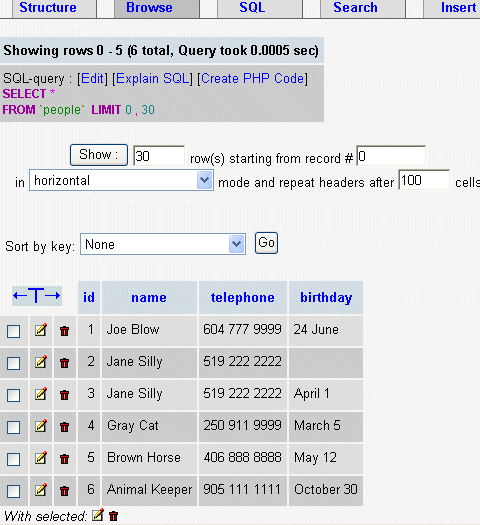
When you've finished entering  several records into the table, you can check them by clicking on the  Browse tab. You can click on  individual records for editing or deleting.


browsing your table

You can use the Select tab to refine your display when your database starts grows to many pages of records.
Backup your data
You "don't know what you've got 'til its gone"!
- Click on your database name in the left hand navigation bar
- Click on EXPORT (top tab)
- Highlight the table/s you want to back up
- Select STRUCTURE and DATA radio button
- Select "Enclose table and field names with backquotes"
-  Select "Save as file" and "zipped" check boxes
- Click "Go" and a zipped archive file will be generated.
Well done! - you've created a database, a table and fields, entered in a few records, viewed the records, edited and perhaps deleted some of them and practised backing up.

Install phpMyAdmin on Linux


phpMyAdmin is a web-based tool written in PHP to manage the MySQL database. Apart from viewing the tables (and other db objects), you can perform lot of DBA functions through the web based interface. You can also execute any SQL query from the UI.


Installation  and configure of phpMyAdmin on Linux distributions.

1. phpMyAdmin Pre requisites

Make sure you have PHP 5 (or above) installed.

# php -v
PHP 5.3.2 (cli) (built: May 19 2010 03:43:49)
 
Make sure you have MySQL 5 (or above) installed.

# mysql -V
mysql  Ver 14.14 Distrib 5.1.47, for pc-linux-gnu (i686) using readline 5.1
 
Make sure Apache is installed and running.

PHP5 Modules

If you don’t have PHP, I recommend that you install PHP from source. Following is the configure command I executed while installing PHP from source. This includes all the required PHP modules for phpMyAdmin.

./configure --with-apxs2=/usr/local/apache2/bin/apxs --with-mysql --with-bz2 --with-zlib 
--enable-zip --enable-mbstring --with-mcrypt


If you don’t compile PHP5 with the above options, you’ll get following error message from phpMyAdmin web interface.
  • GZip – GZip compression and decompression requires functions (gzencode) which are unavailable on this system.
  • Bzip2 – Bzip2 compression and decompression requires functions (bzopen, bzcompress) which are unavailable on this system.
  • ZIP – Zip decompression requires functions (zip_open) which are unavailable on this system.
  • ZIP – Zip compression requires functions (gzcompress) which are unavailable on this system.

2. Download and Install phpmyadmin in Apache DocumentRoot

Identify your Apache’s DocumentRoot.


# grep DocumentRoot /usr/local/apache2/conf/httpd.conf
DocumentRoot /usr/local/apache2/htdocs


Download the latest version of phpMyAdmin
 

# cd /usr/local/apache2/htdocs

# tar xvfz phpMyAdmin-3.3.7-all-languages.tar.gz

# mv phpMyAdmin-3.3.7-all-languages phpmyadmin


3. Secure the phpmyadmin Directory – Create phpmy user

Create phpmy Unix user.

# adduser phpmy

# passwd phpmy
 
 
Check which user and group is used by Apache.

# egrep 'User|Group' /usr/local/apache2/conf/httpd.conf
User daemon
Group daemon
 
Modify the phpmyadmin directory’s user ownership to phpmy user.
# cd /usr/local/apache2/htdocs

# chown -R phpmy.daemon phpmyadmin/


4. Update phpMyAdmin config.inc from Wizard

You need to setup the config.inc file properly for phpMyAdmin to work. You can either create and edit this file manually, or use the config phpMyAdmin installer setup wizard. I recommend that you use the setup wizard, as it is very straight forward. To do that, you should create the following dummy config.inc with proper permission.


# cd /usr/local/apache2/htdocs/phpmyadmin/

# mkdir config

# chmod o+rw config

# cp config.sample.inc.php config/config.inc.php

# chmod o+w config/config.inc.php


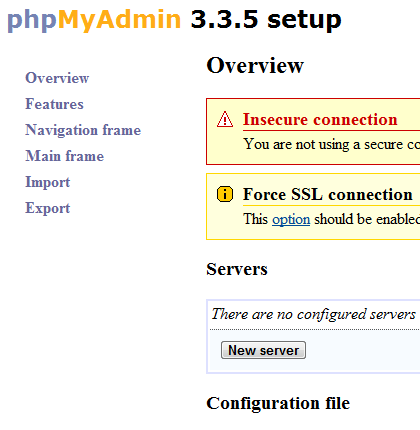
Now, invoke the phpMyAdmin setup wizard from the browser using the 
URL: http://{your-ip-address}/phpmyadmin/setup/index.php . This will 
show the following setup wizard.


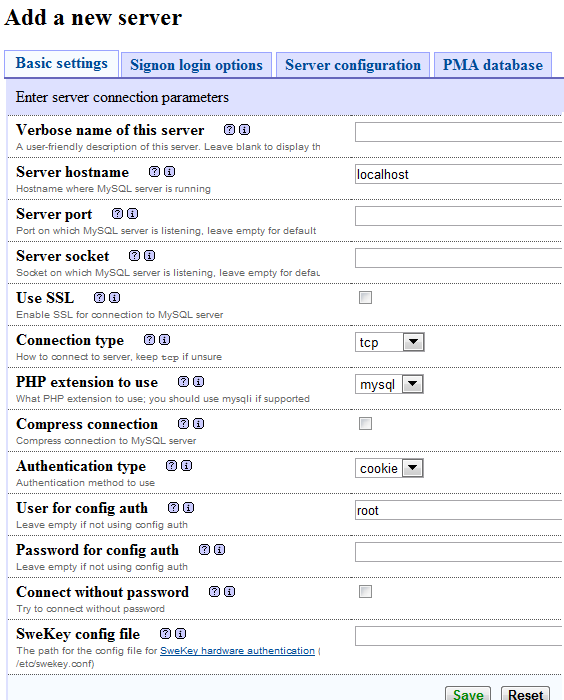
Click on “New Server”, which will display following server wizard.


Fill-out following information in the new server screen. Leave other fields to default values.
  • Verbose Name of the Server – Give some descriptive server name.
  • Password for Config Auth – Enter the MySQL root password here.
  • Authentication Type – The default selection is cookie. Just use that.
Click on Save to save the configuration. You might see following warning messages. Ignore it for now.
  • Use SSL – You should use SSL connections if your web server supports it
  • PHP extension to use – You should use mysqli for performance reasons
  • Blowfish secret – You didn’t have blowfish secret set and have enabled cookie authentication, so a key was automatically generated for you. It is used to encrypt cookies; you don’t need to remember it.

5. Launch phpmyadmin

Invoke phpMyAdmin from the browser using the URL: http://{your-ip-address}/phpmyadmin/index.php
If you’ve installed phpMyAdmin on a Linux desktop distribution, you can also access phpMyAdmin using the localhost URL: http://localhost/phpmyadmin/index.php
Login with your MySQL root password. i.e use “root” for phpmyadmin username. Use MySQL root’s password for phpmyadmin password.


If you see the “Cannot load mcrypt extension. Please check your PHP configuration.” message, you didn’t compile your PHP with mcrypt. Make sure you have libmcrypt and libmcrypt-devel packages installed on your Linux before you compile PHP with –with-mcrypt option.


You will also see the message : “Directory config, which is used by the setup script, still exists in your phpMyAdmin directory. You should remove it once phpMyAdmin has been configured.”
Just like the message says, remove the config directory.


# cd /usr/local/apache2/htdocs/phpmyadmin

# rm -rf config


After moving the config directory, if you go to setup/index.php url, you’ll see following message. This is a good thing, as you’ve already configured the phpMyAdmin.
“Cannot load or save configuration. Please create web server writable folder config in phpMyAdmin top level directory as described in documentation. Otherwise you will be only able to download or display it.”
Once you’ve logged-in you should be able to manage all the MySQL databases from your browser.